Elemental the visual way
This quickstart will show you how to deploy the Elemental plugin into an existing Rancher Manager instance.
Once installed, you'll be able to provision a new Elemental cluster based on RKE2 or K3s.
Prerequisites
- A Rancher server (v2.7.0 or later) configured (server-url set)
- To configure the Rancher
server-urlplease check the Rancher docs
- To configure the Rancher
- A machine (bare metal or virtualized) with TPM 2.0
- Hint 1: Libvirt allows setting virtual TPMs for virtual machines example here
- Hint 2: You can enable TPM emulation on bare metal machines missing the TPM 2.0 module example here
- Hint 3: Make sure you're using UEFI (not BIOS) on x86-64, or the ISO won't boot
- Hint 4: A minimum volume size of 25 GB is recommended. See the Elemental Teal partition table for more details
- Hint 5: CPU and RAM requirements depend on the Kubernetes version installed, for example K3s or RKE2
- Helm Package Manager (https://helm.sh/)
- For ARM (aarch64) - One SD-card (32 GB or more, must be fast - 40MB/s write speed is acceptable) and a USB-stick for installation
Install Elemental Operator
elemental-operator is the management endpoint, running the management
cluster and taking care of creating inventories, registrations for machines and much more.
We will use the Helm package manager to install the elemental-operator chart into our cluster.
helm upgrade --create-namespace -n cattle-elemental-system --install elemental-operator-crds oci://registry.suse.com/rancher/elemental-operator-crds-chart
helm upgrade --create-namespace -n cattle-elemental-system --install elemental-operator oci://registry.suse.com/rancher/elemental-operator-chart
Now after a few seconds you should see the operator pod appear on the cattle-elemental-system namespace:
kubectl get pods -n cattle-elemental-system
NAME                                  READY   STATUS    RESTARTS   AGE
elemental-operator-64f88fc695-b8qhn   1/1     Running   0          16s
The Elemental Operator chart is distributed via an OCI registry: Helm correctly supports OCI based registries starting from the v3.8.0 release.
When upgrading from an elemental-operator release embedding the Elemental CRDs (version < 1.2.4) the elemental-operator-crds chart installation will fail. You will need to upgrade the elemental-operator chart first, and only then install the elemental-operator-crds chart.
Non-stable installations
Besides the Helm charts listed above, there are two other non-stable
versions available.
-
Staging: refers to the latest tagged release from Github. This is documented in the Next pages.
-
Development: refers to the 'tip of HEAD' from Github. This is the ongoing development version and changes constantly.
- Staging version (x86-64, ARM64 (Raspberry Pi 4))
- Development version (x86-64, ARM64 (Raspberry Pi 4))
helm upgrade --create-namespace -n cattle-elemental-system --install elemental-operator-crds oci://registry.opensuse.org/isv/rancher/elemental/staging/charts/rancher/elemental-operator-crds-chart
helm upgrade --create-namespace -n cattle-elemental-system --install elemental-operator oci://registry.opensuse.org/isv/rancher/elemental/staging/charts/rancher/elemental-operator-chart
The development version is not recommended for production environments. We welcome feedback via Slack or Github issues, but it could be unstable and contain experimental features that can be dropped without notice.
helm upgrade --create-namespace -n cattle-elemental-system --install elemental-operator-crds oci://registry.opensuse.org/isv/rancher/elemental/dev/charts/rancher/elemental-operator-crds-chart
helm upgrade --create-namespace -n cattle-elemental-system --install --set image.imagePullPolicy=Always elemental-operator oci://registry.opensuse.org/isv/rancher/elemental/dev/charts/rancher/elemental-operator-chart
Installation options
There are a few options that can be set in the chart install but that is out of scope for this document. You can see all the values on the chart values.yaml.
Enable the Rancher Manager Extensions Support
In order to enable the Rancher Manager Extensions Support, you'll need to follow the steps below:
- Open a web browser, connect and login to your Rancher Manager instance
- Click on the top left menu
aand click onExtensions
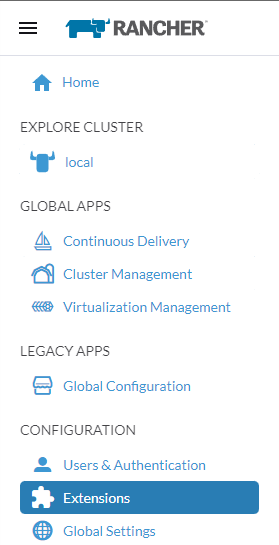
- Click on
Enablebutton to install theExtension Operator
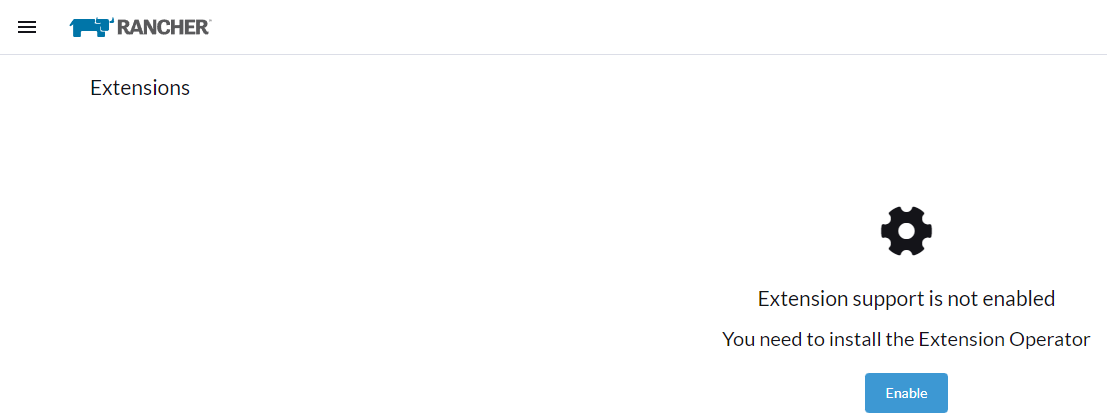
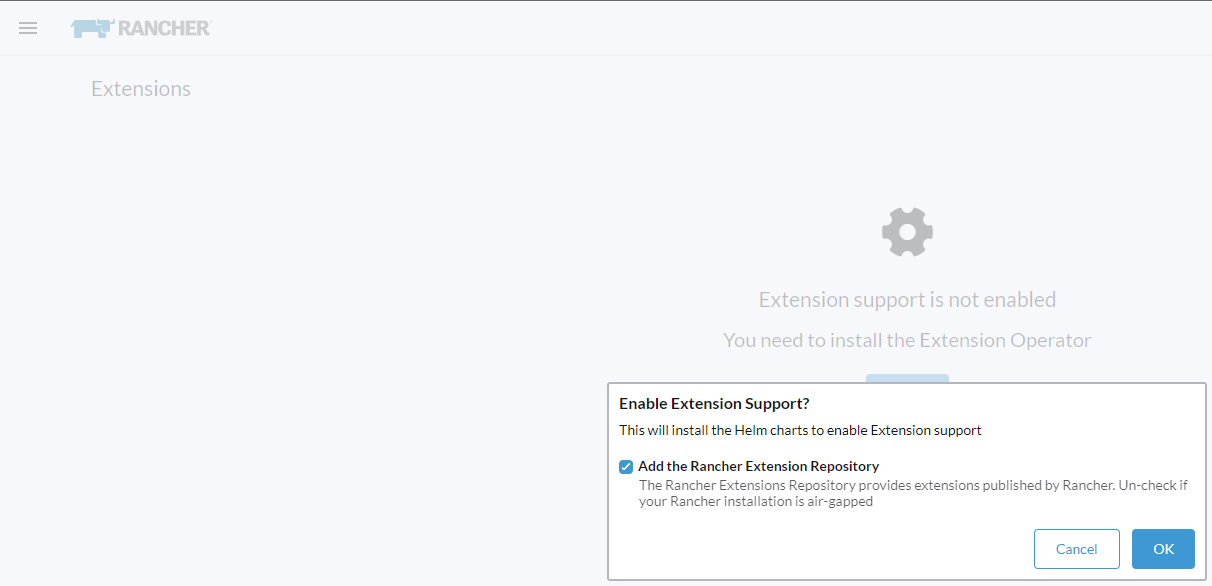
- A popup will appear, click on the
OKbutton to continue and install the Rancher Manager Extensions repository
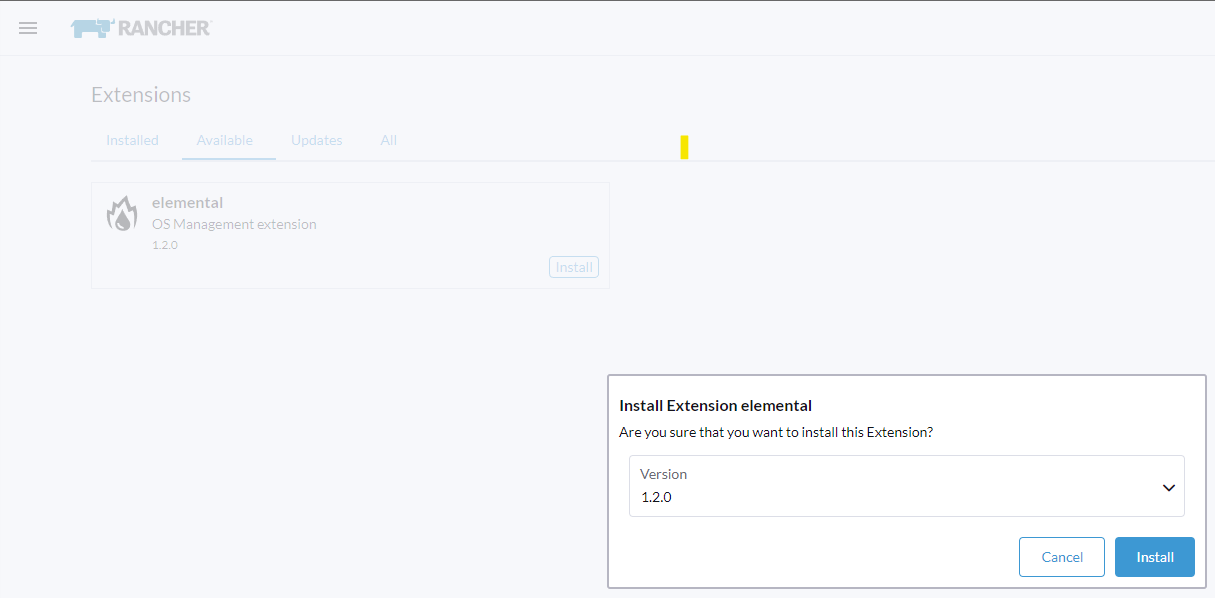
Install the elemental plugin
After the Rancher Manager Extensions Support is enabled, you can install the elemental plugin as follow:
- Under the
Availabletab you will seeelementalplugin available
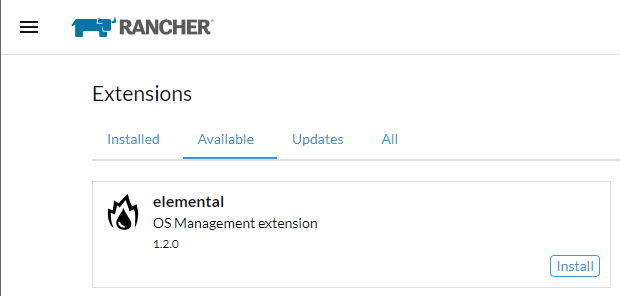
If the Available tab shows no entries, refresh the page. The elemental plugin will then appear.
- Click on the
Installbutton, a popup will appear and click onInstallagain to continue.
- On the
Installedtab, theelementalplugin is now listed.
If the elemental plugin is listed and the status stays at Installing..., refresh the page. The elemental plugin will display correctly.
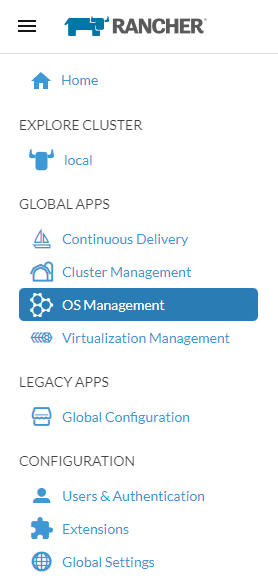
Once the elemental plugin installed, you can see the OS Manamagent option in the Rancher Manager menu.
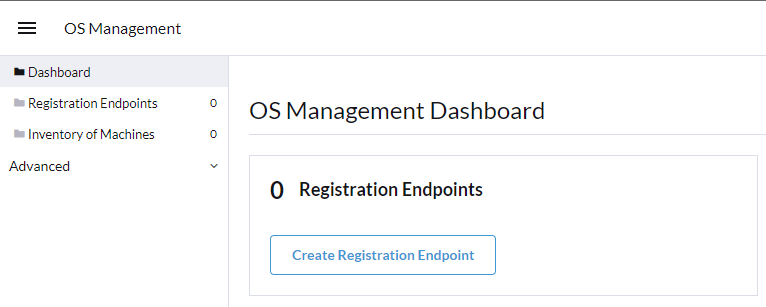
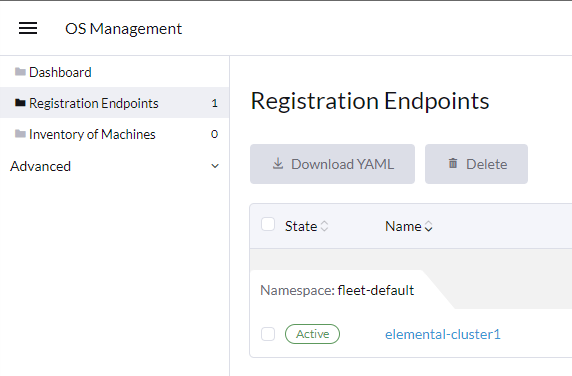
Add a Machine Registration Endpoint
In the OS Management dashboard, click the Create Registration Endpoint button.
Now here either you can enter each detail in its respective places or you can edit this as YAML and create the endpoint in one go. Here we'll edit every fields.
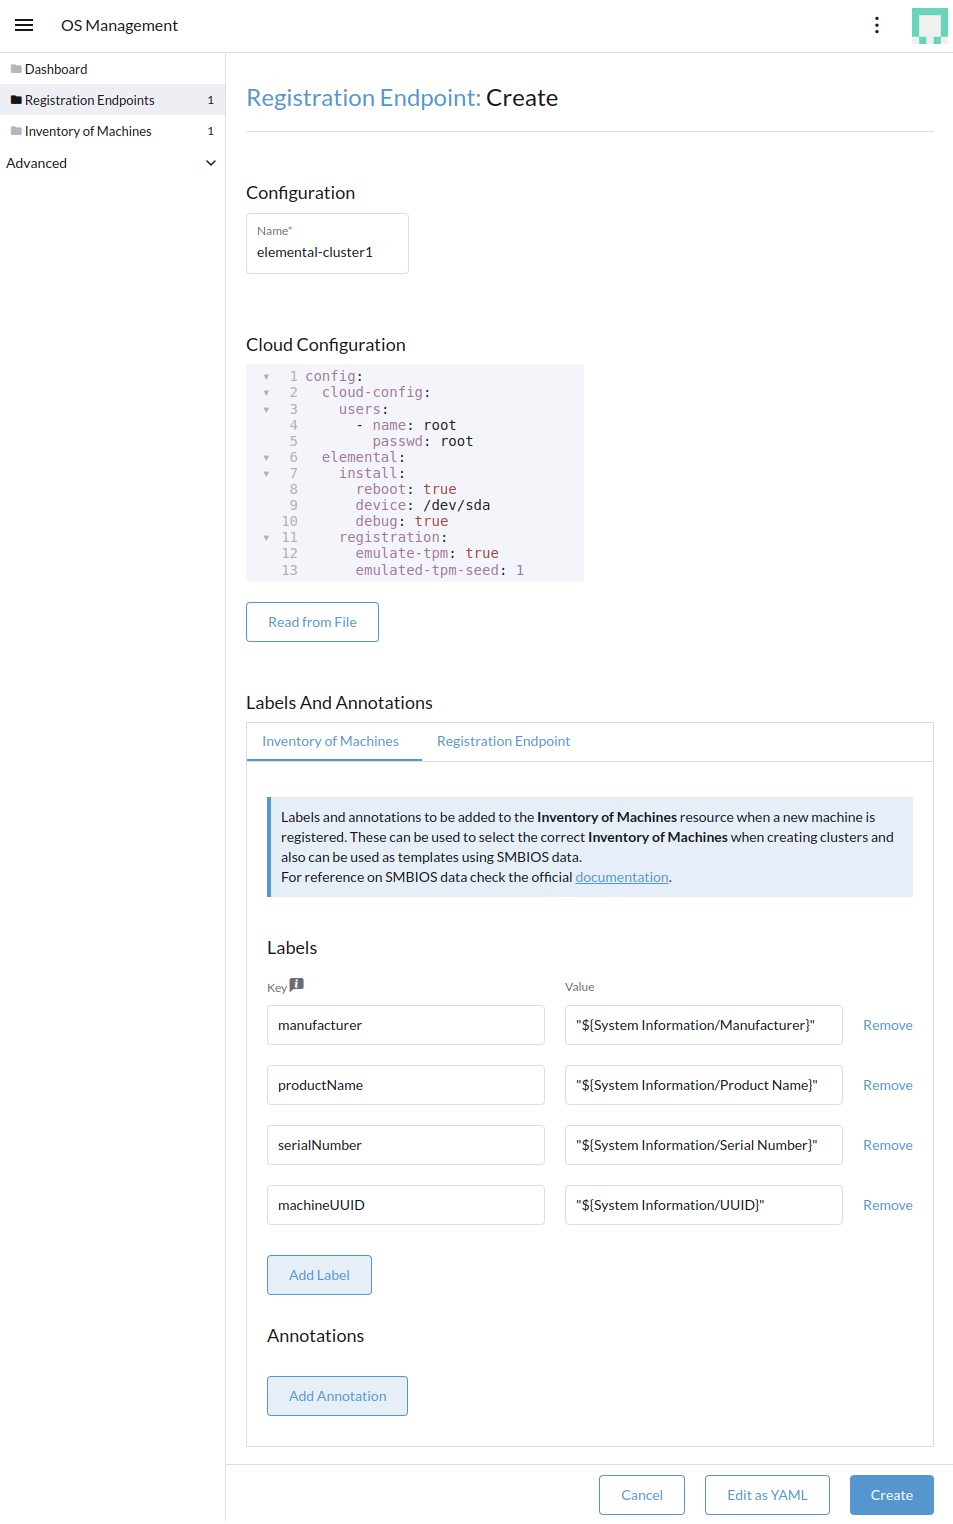
name: elemental-cluster1: change this as per your need
device: /dev/sda: make sure your target device is "sda". Otherwise find out how the disk device is named and change it here. For example, in Raspberry Pi it could be "mmblk"
emulate-tpm: true: use this only if your target device doesn't have a TPM device and you have a way of emulating TPM like in VMware or KVM
emulated-tpm-seed: 1: increase this by 1 for every new machine. If this value is not set, each machine will receive the same TPM hash and it won't show up under the machine inventory.
Emulated TPM is only for non-production usage like for testing as it beats the purpose of security. So in production usage use the code above without the emulate-tpm and emulate-tpm-seed
Once you create the machine registration end point it should show up as active.
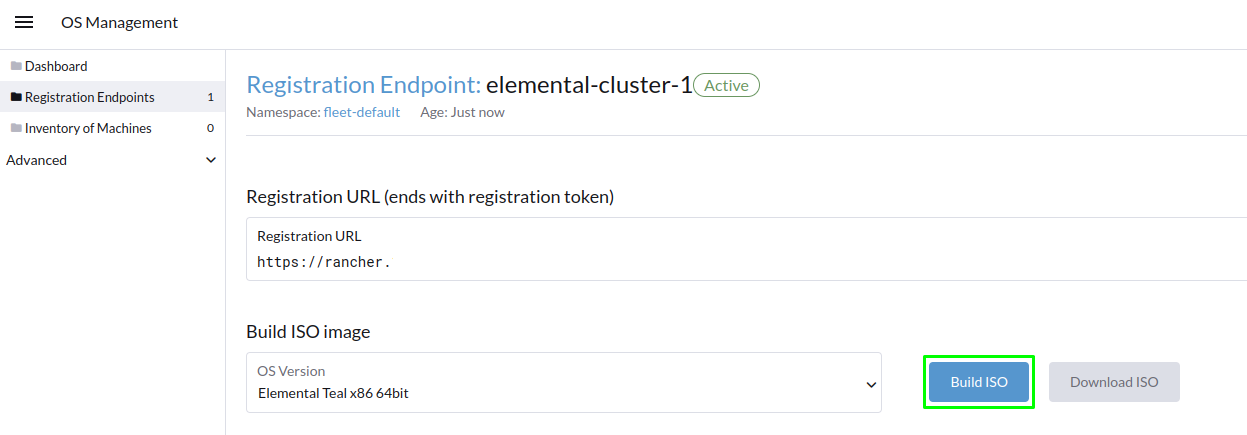
Preparing the installation (seed) image
Now this is the last step, you need to prepare an Elemental Teal seed image that includes the initial registration config, so it can be auto registered, installed and fully deployed as part of your cluster. The contents of the file are nothing more than the registration URL that the node needs to register and the proper server certificate, so it can connect securely.
This seed image can then be used to provision an infinite number of machines.
The seed image is created as a Kubernetes resource above and can be built using the Build ISO button:
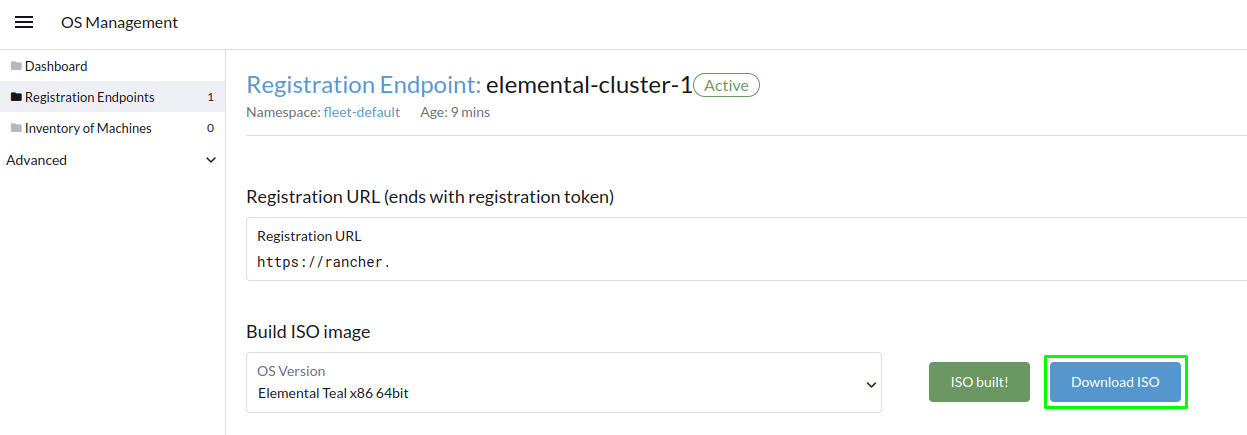
Once the build is done, ISO can be downloaded using the Download ISO button:
You can now boot your nodes with this image and they will:
- Register with the registrationURL given and create a per-machine
MachineInventory - Install Elemental Teal to the given device
- Reboot
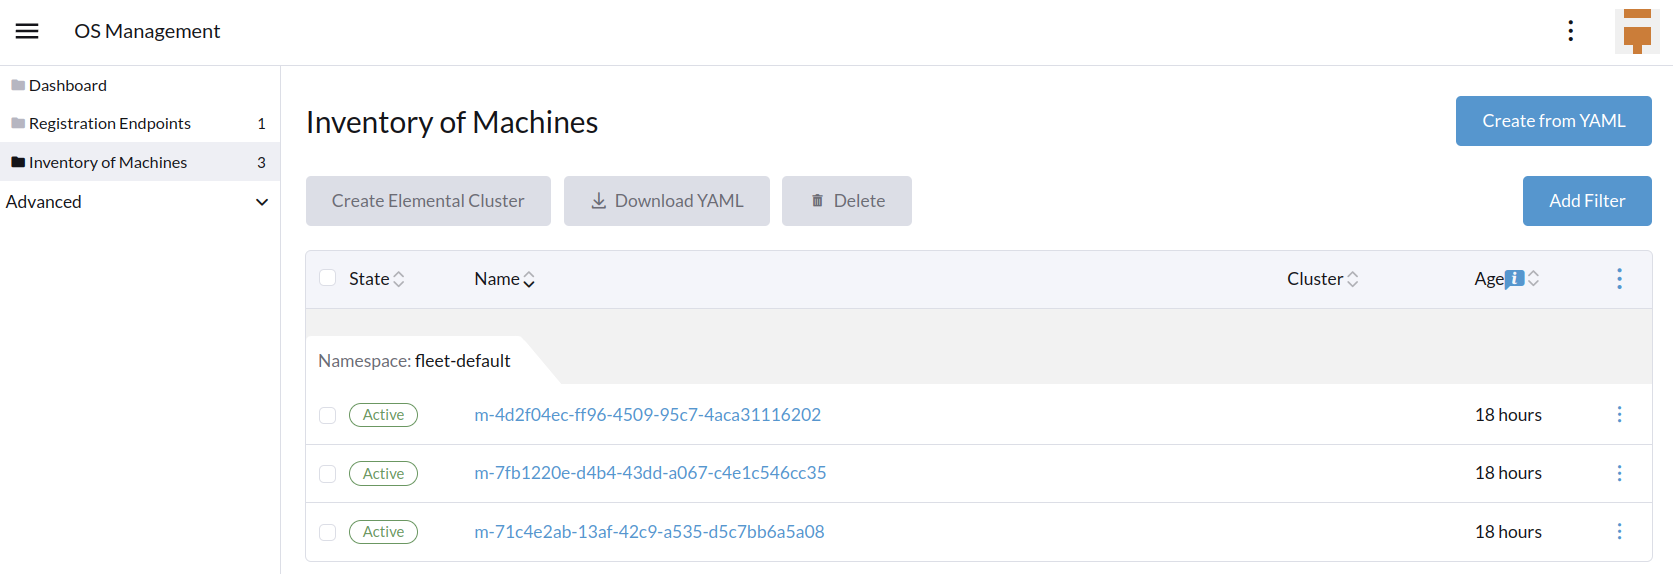
Machine Inventory
When nodes are booting up for the first time, they connect to Rancher Manager and a Machine Inventory is created for each node.
Custom columns are based on Machine Inventory Labels which you can add when you create your Machine Registration Endpoint:
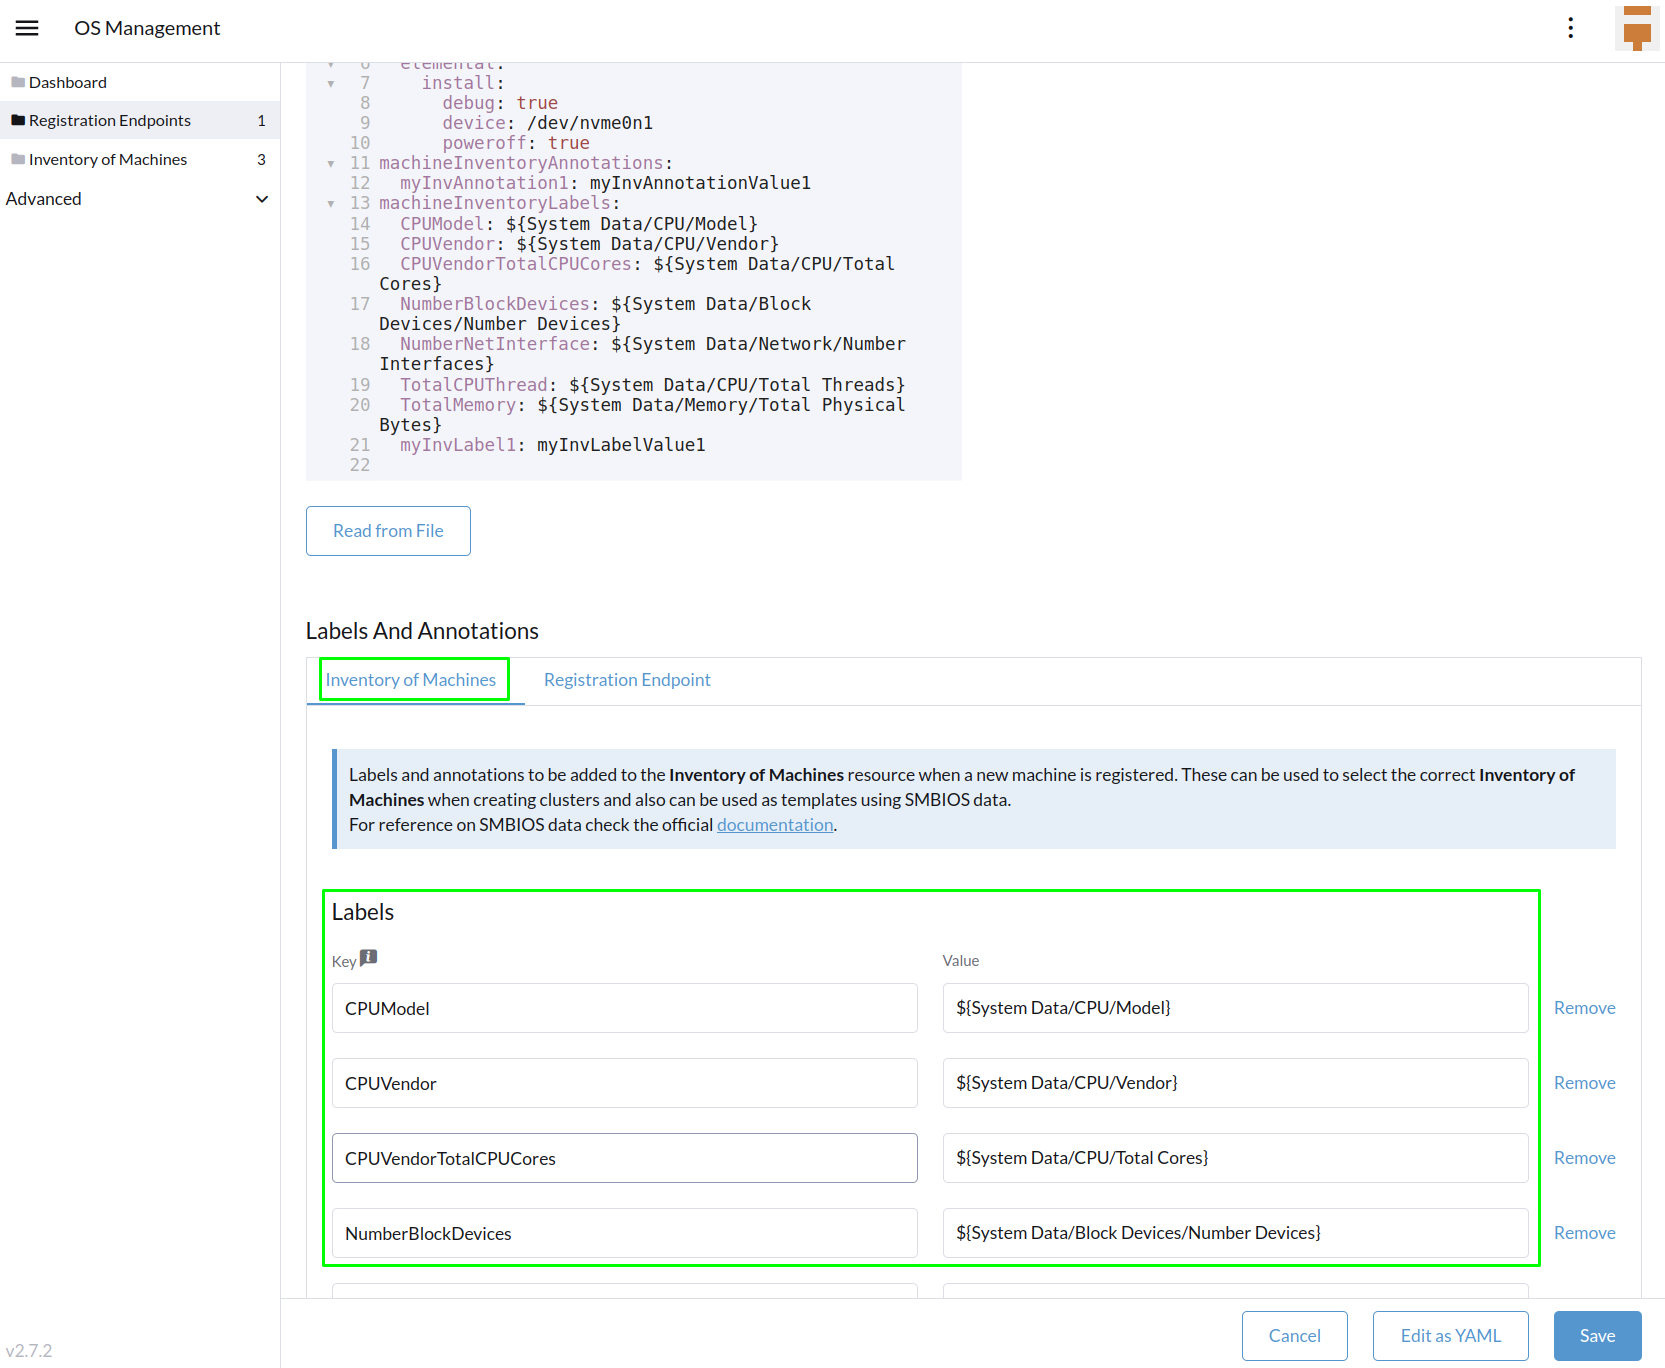
On the following screenshot, Hardware Labels are used as custom columns:
You can also add custom columns by clicking on the three dots menu.
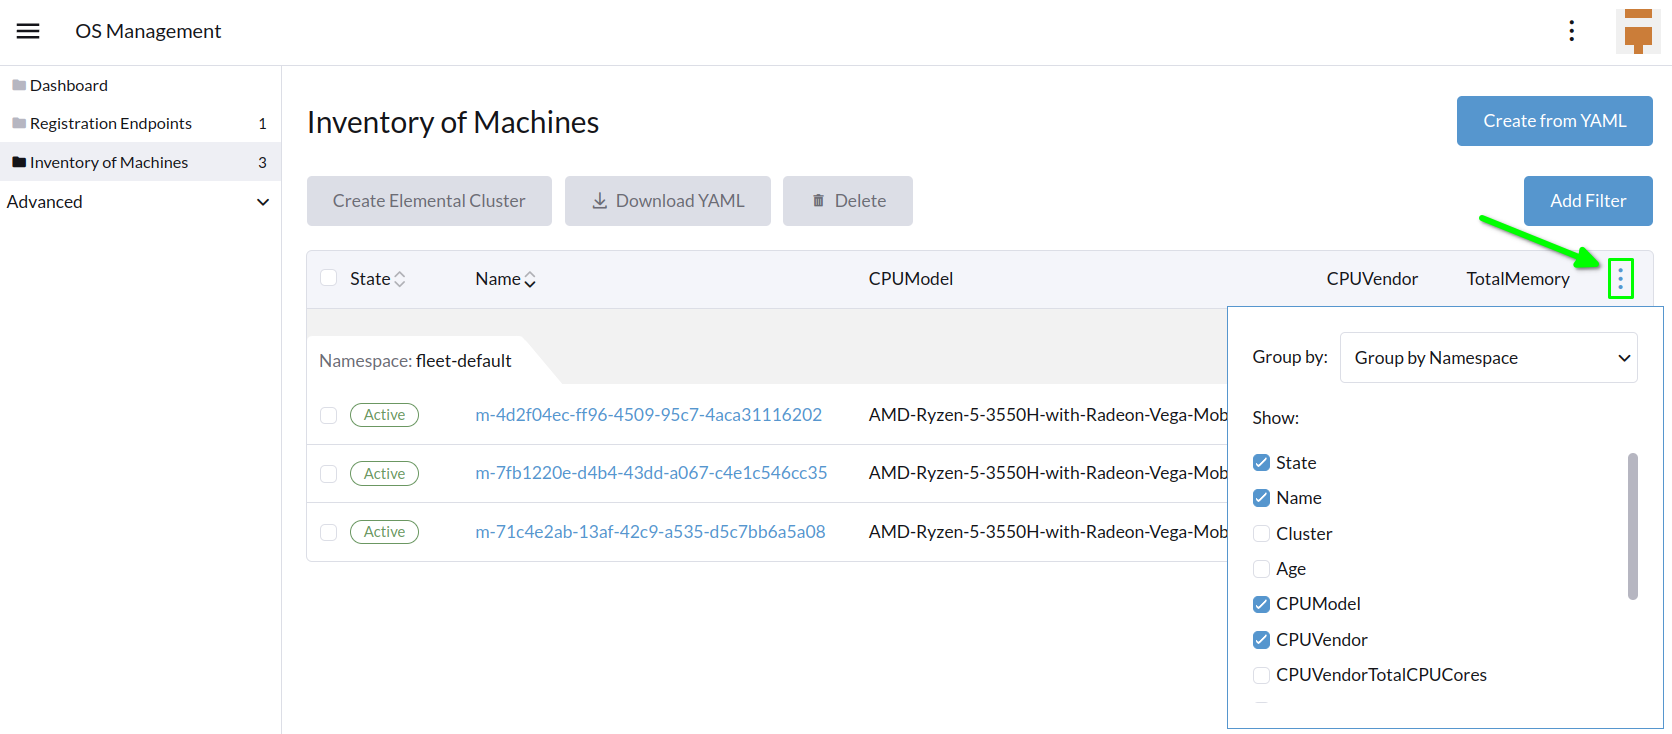
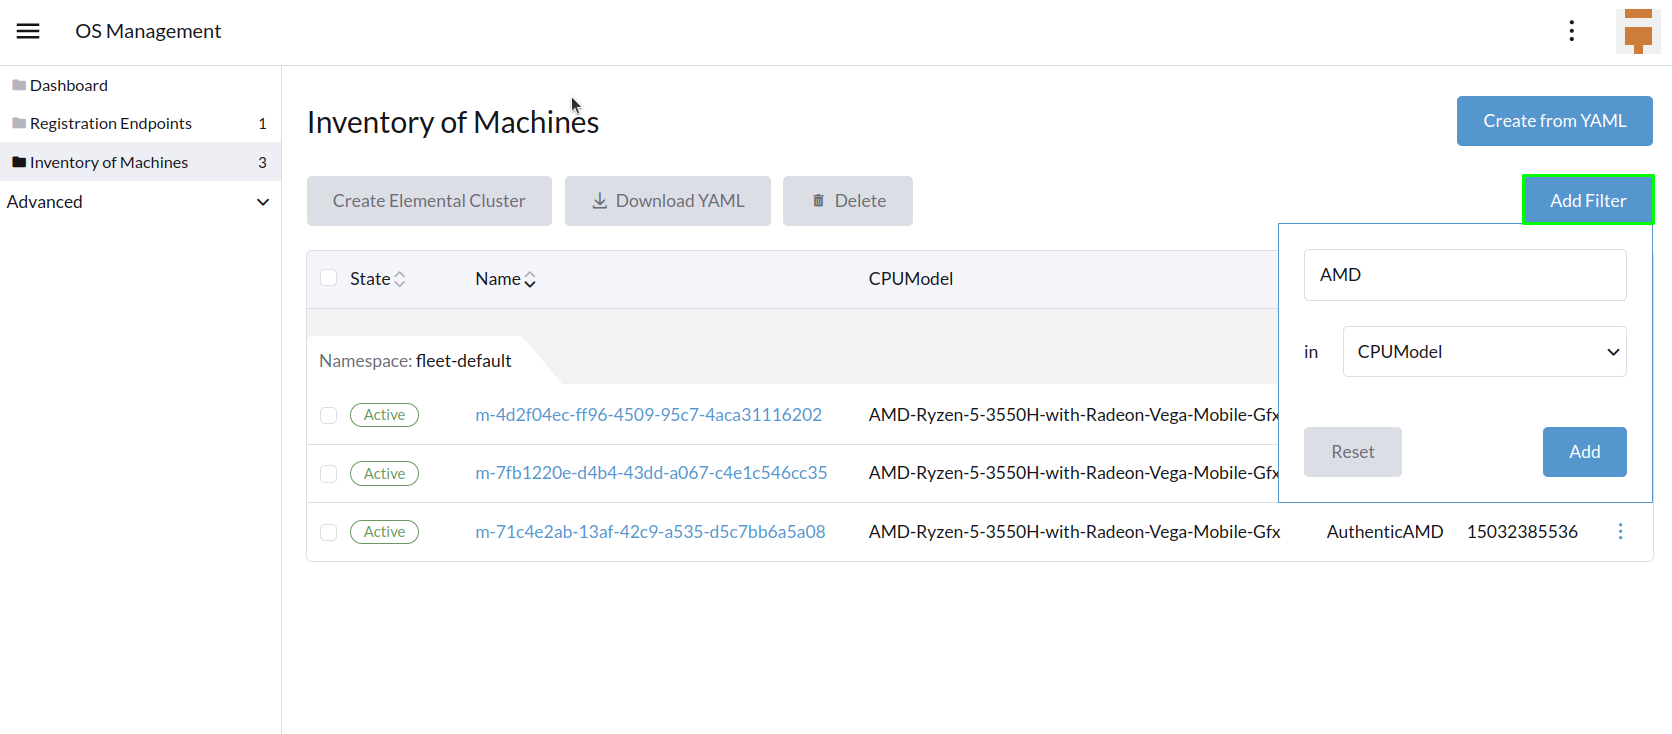
Finally, you can also filter your Machine Inventory using those labels.
For instance if you only want to see your AMD machines, you can filter on CPUModel like below:
Create your first Elemental Cluster
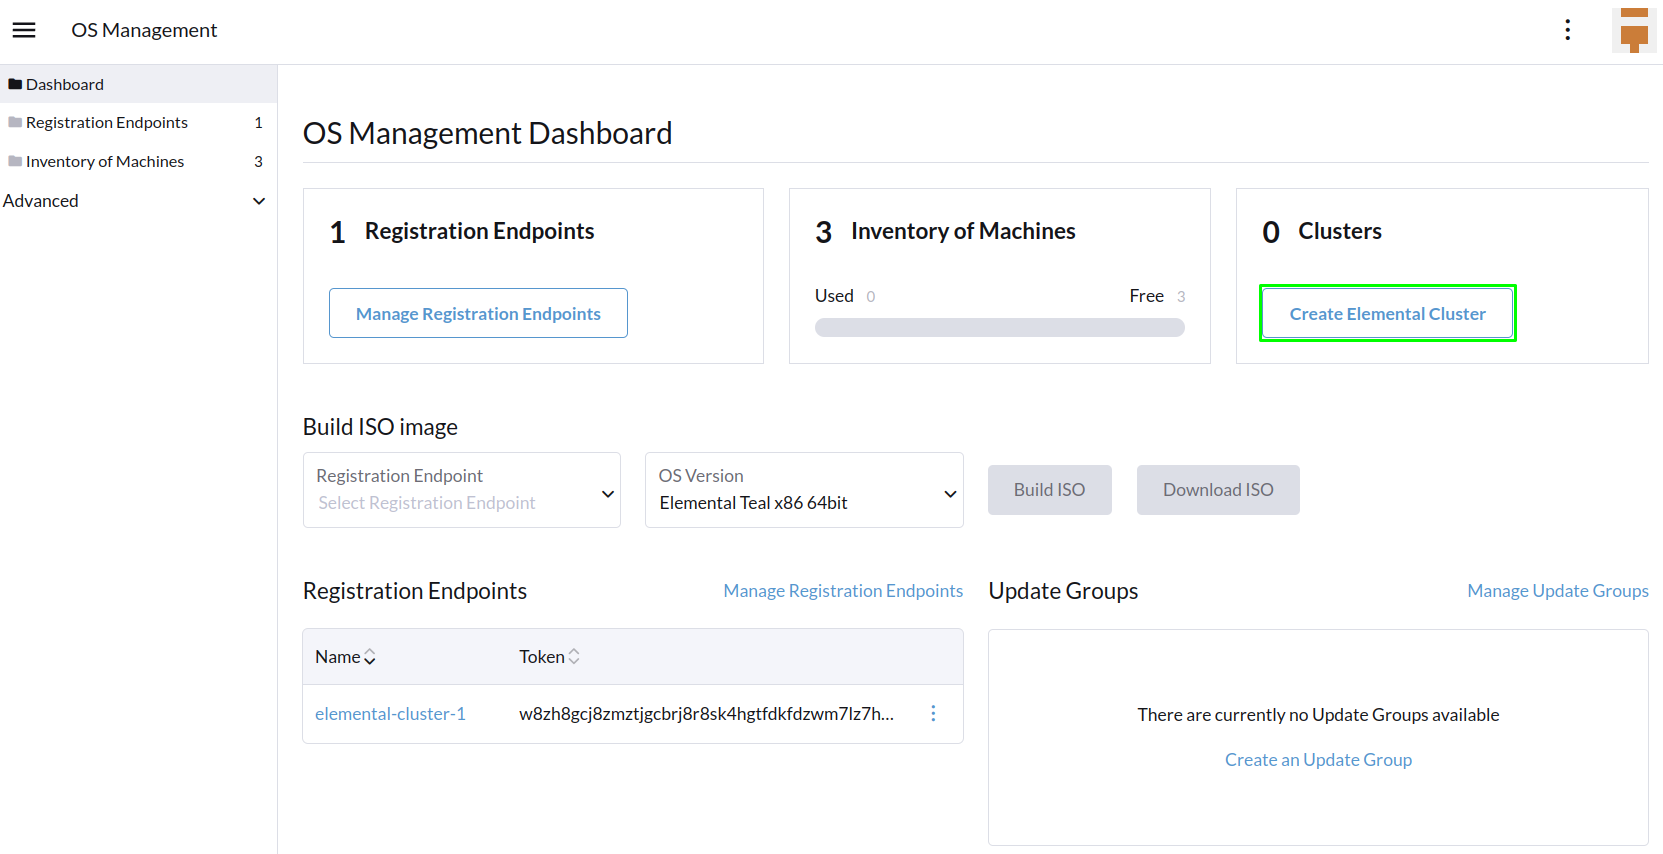
Now let's use those Machine Inventory to create a cluster by clicking on Create Elemental Cluster :
For your Elemental cluster, you can either choose K3s or RKE2 for Kubernetes.
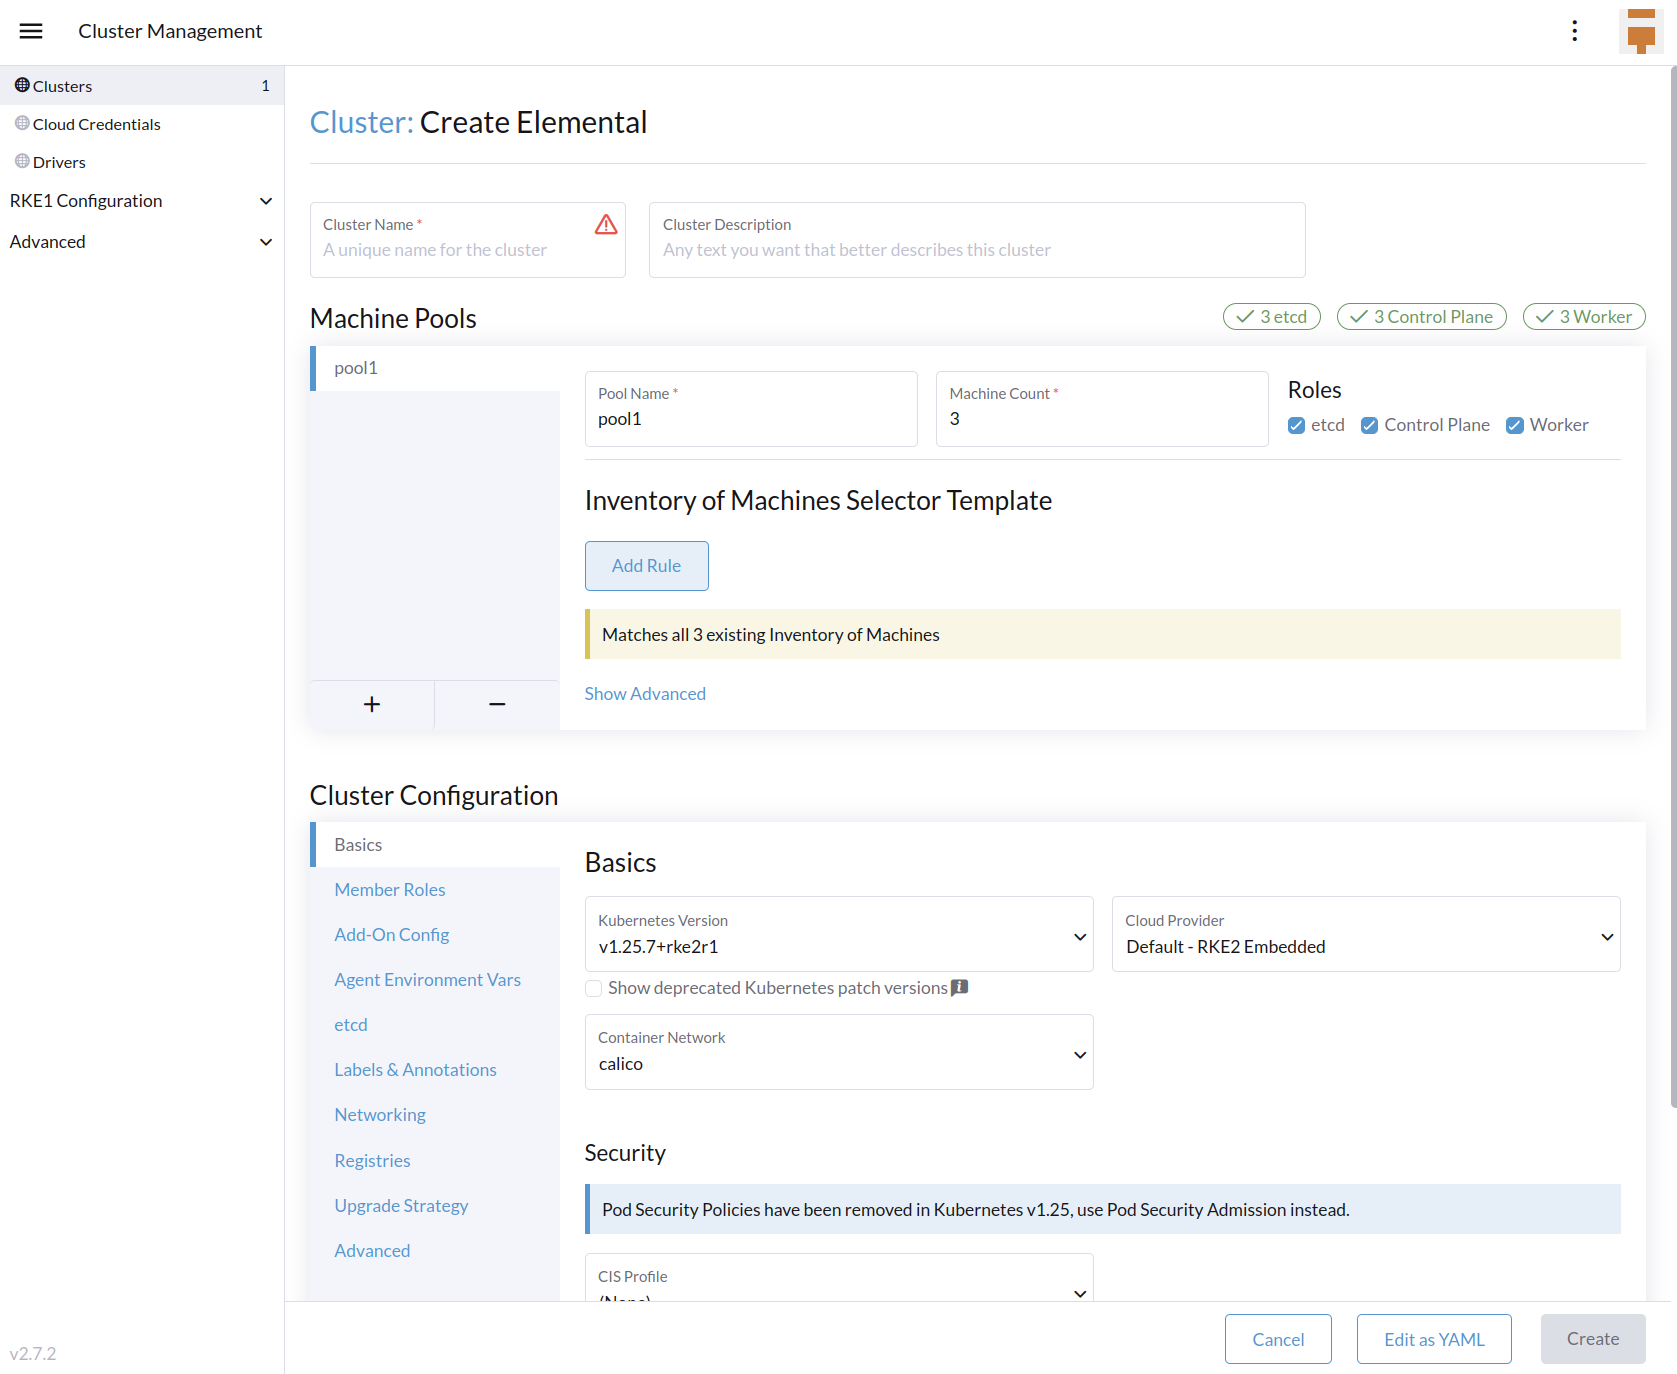
Most of the options are coming from Rancher, that's why we will not detail all the possibilities. Feel free to check the Rancher Manager documentation if you want to know more.
However, it is important to highlight the Inventory of Machines Selector Template section.
It lets you choose which Machine Inventory you want to use to create your Elemental cluster using the previously defined Machine Inventory Labels :
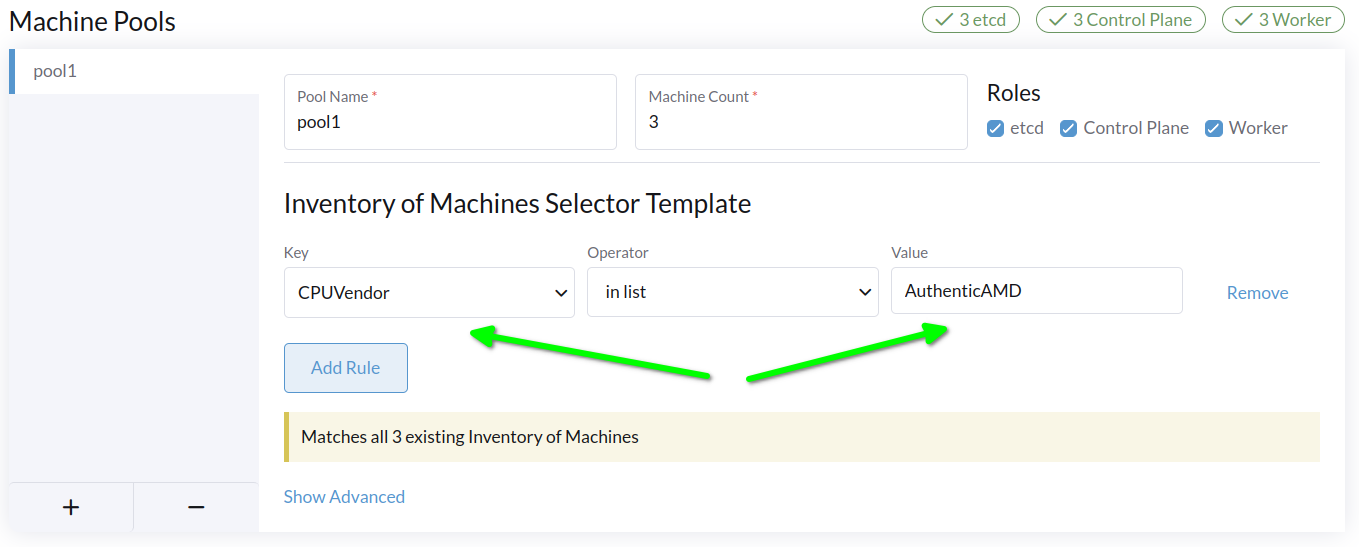
As our three Machine Inventories contain the label CPUVendor with the key AuthenticAMD, the three machines will be used to create the Elemental cluster.