Introduction
In a lot of enterprise environments, servers or VMs running on premises do not have direct Internet access. Instead, the connection to external services is done through a HTTP(S) proxy for security reasons. This tutorial shows you how to set up an Elemental deployment in such an environment.
This guide will not cover the Rancher installation behind a proxy. It's a different use case and you can find the detailed documentation here.
For this documentation, we assume you are using a SUSE family system (like SLE Micro), so proxy settings have to be written in /etc/sysconfig/proxy.
Proxy settings must be configured in the following locations:
- Machine Registration Endpoint
- SeedImage resource
- Elemental cluster configuration
The elemental-system-agent needs proxy settings to reach the Rancher Manager.
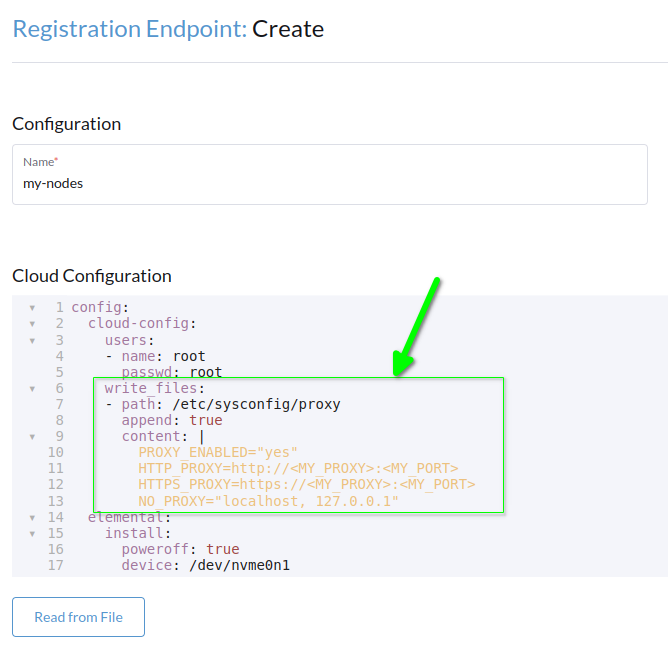
To achieve that, you need to fill the cloud-init section of the Machine Registration Endpoint.
You can do it either with UI or CLI.
- CLI
- UI
apiVersion: elemental.cattle.io/v1beta1
kind: MachineRegistration
metadata:
  name: my-nodes
  namespace: fleet-default
spec:
  config:
    cloud-config:
      write_files:
      - path: /etc/sysconfig/proxy
        append: true
        content: |
          PROXY_ENABLED="yes"
          HTTP_PROXY=http://<MY_PROXY>:<MY_PORT>
          HTTPS_PROXY=https://<MY_PROXY>:<MY_PORT>
          NO_PROXY="localhost, 127.0.0.1"
      users:
        - name: root
          passwd: root
    elemental:
      install:
        reboot: true
        device: /dev/sda
        debug: true
      registration:
        emulate-tpm: true
Elemental-register
Elemental-register is the first communication endpoint between the new host and Rancher Manager, this is the first place where proxy settings need to be set.
At the time of writing, it's only possible to configure proxy settings for the ISO with the CLI. The proxy settings aren't implemented in the UI.
The process happens when you boot your Elemental ISO for the first time, in order to configure the proxy settings you have to include a cloud-init definition in the ISO.
To do that, you have to create a SeedImage definition.
apiVersion: elemental.cattle.io/v1beta1
kind: SeedImage
metadata:
  name: ...
  namespace: ...
spec:
  baseImage: registry.suse.com/suse/sle-micro-iso/5.5:2.0.2
  cloud-config:
    write_files:
    - path: /etc/sysconfig/proxy
      append: true
      content: |
        PROXY_ENABLED="yes"
        HTTP_PROXY=http://<MY_PROXY>:<MY_PORT>
        HTTPS_PROXY=https://<MY_PROXY>:<MY_PORT>
        NO_PROXY="localhost, 127.0.0.1"
  registrationRef:
    apiVersion: elemental.cattle.io/v1beta1
    kind: MachineRegistration
    name: ...
    namespace: ...
Apply the YAML with kubectl and then, print your SeedImage definition to get the URL to download it:
kubectl apply -f <my_seedimage_yaml_file>
kubectl get seedimage <seed_image_name> -n <namespace> -o yaml
Boot the ISO and you should see your new system appears in Machine inventory.
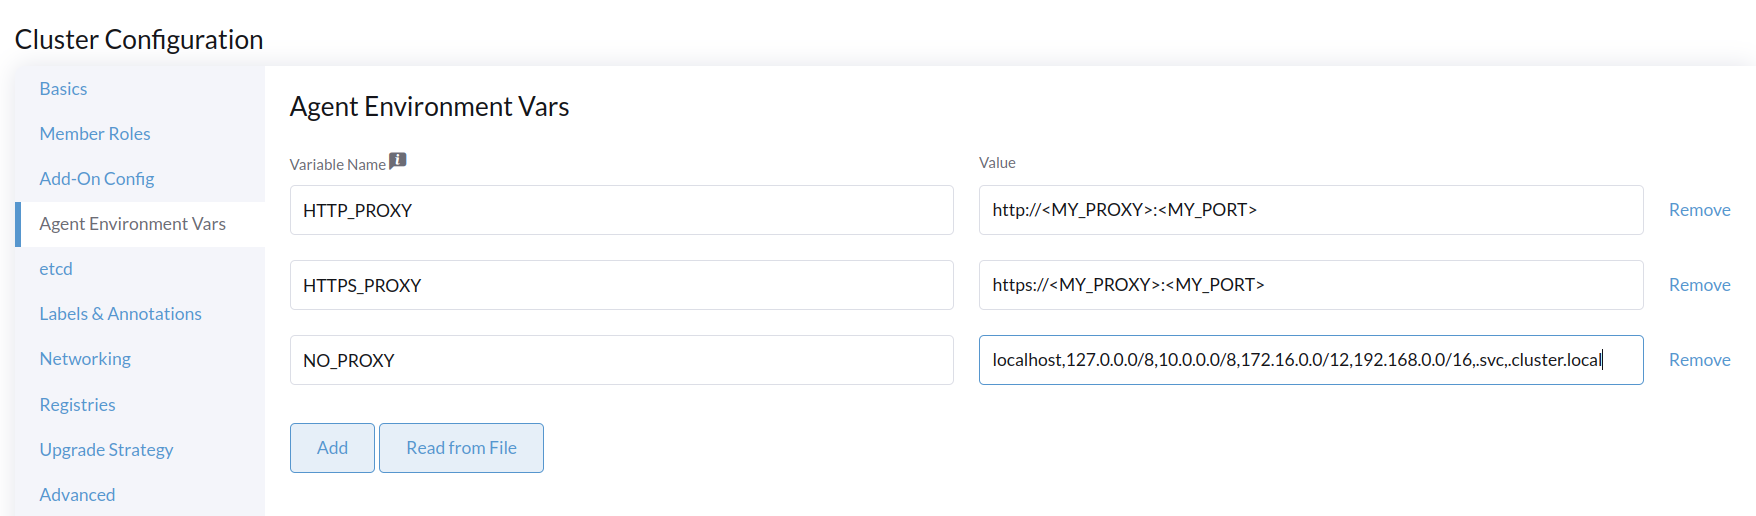
Create Elemental cluster
For this step, you can use either the UI or CLI.
- CLI
- UI
kind: Cluster
apiVersion: provisioning.cattle.io/v1
metadata:
  name: my-cluster
  namespace: fleet-default
spec:
  agentEnvVars:
  - name: HTTP_PROXY
    value: http://<MY_PROXY>:<MY_PORT>
  - name: HTTPS_PROXY
    value: https://<MY_PROXY>:<MY_PORT>
  - name: NO_PROXY
    value: localhost,127.0.0.0/8,10.0.0.0/8,172.16.0.0/12,192.168.0.0/16,.svc,.cluster.local
  rkeConfig:
    machineGlobalConfig:
      etcd-expose-metrics: false
      profile: null
    machinePools:
      - controlPlaneRole: true
        etcdRole: true
        machineConfigRef:
          apiVersion: elemental.cattle.io/v1beta1
          kind: MachineInventorySelectorTemplate
          name: my-machine-selector
        name: pool1
        quantity: 1
        unhealthyNodeTimeout: 0s
        workerRole: true
    machineSelectorConfig:
      - config:
          protect-kernel-defaults: false
    registries: {}
  kubernetesVersion: v1.24.8+k3s1
You can see that proxy settings are added below agentEnvVars.